Quantex GmbH
DE RU EN
Your region: Europe

Short description

The scanner is shipped with the latest firmware. If the scanner has not been used for some time, then the firmware must be updated.

SD Boot Loader is required to update Scandoc scanner firmware in J2534 mode.

When do I need to update the firmware in the scanner:

  • If you are installing a new version of the J2534 software for ScanDoc.
  • If you used an old version of ScanDoc and now want to use the scanner in j2534 mode.
  • If you do not know what version of the firmware you have installed, then install the latest version.

In the first version of the ScanDoc scanner (in a metal case), you can also change the IP address of the device using this program.
Installing the program on a computer


Installing the program on a computer
  1. Download the setup file Setup.exe from the ScanDoc® J2534 description page.
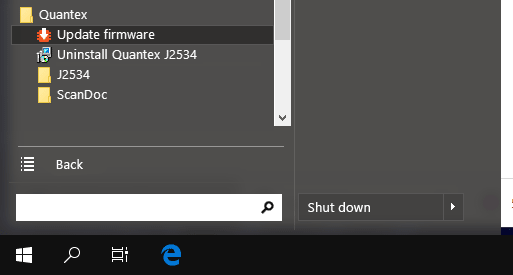
  2. Install and run the program (Start -> Quantex -> Update Firmware)
If you used to work with an old program and are now switching to a new one, be sure to enter the scanner into download mode. If you worked in a new program, then you do not need to enter the scanner into download mode.

Switching the scanner to boot mode


This is only necessary if you were working with an old program and now switch to a new program or buy a new scanner. If you worked in a new program, then skip this step.


Boot mode (latest generation ScanDoc Compact scanner in a short package)

  • Apply power to the scanner (for example, connect it to the diagnostic connector).
  • On the underside of the scanner, you can see the recessed reset button. Press this button with any thin object, hold for 3 seconds, connect the device to the power / diagnostic socket and only then release the button.
  • The device will be switched to boot mode. (the red LED will light dimly). After a while (approximately 30 seconds), the device will communicate.

Boot mode (old ScanDoc in a metal casing)

  • Turn off the scanner
  • Apply power to the scanner (for example, connect it to the diagnostic connector).
  • While holding the "Wi-Fi" button, press the power button.
  • The device will be switched to boot mode. (the red LED will light dimly). After a while (approximately 30 seconds), the device will communicate.

If the adapter did not update for some reason, then you can exit the boot mode by turning off and then turning on the power of the device.

ScanDoc metal housing must be attached to your account. The procedure is described on the documentation page.

Firmware update


SD Boot Loader first communicates with the scanner and reads its serial number, then communicates with the Quantex server and downloads the firmware for your serial number.
Therefore, it is necessary that the scanner is connected to the computer, and the computer has access to the Internet.
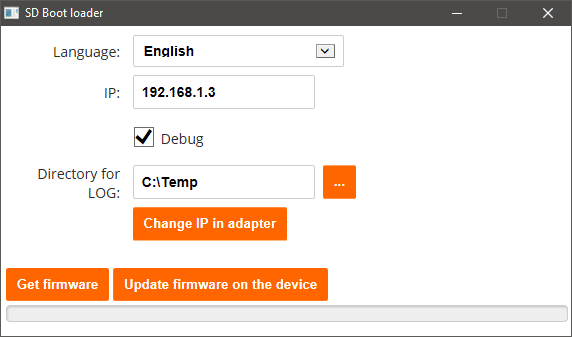
SD Boot Loader Window
  1. Connect ScanDoc to the vehicle's OBD-II diagnostic connector.
  2. Connect to the adapter via cable or via the Wi-Fi wireless network on your computer / smartphone using a password.
    If your scanner has serial number s / n: 06052, then the connection will be called S6052, and the password for it will be scandoc6052.
    Note: This option is configured in the Wi-Fi module of the device by default.
  3. The IP address contains the default address of the scanner. If you specified a different IP address, enter it here.
  4. Click the Get Firmware button
    (The program will connect to the scanner, then download the firmware from the Quantex server)
  5. Click the Update the firmware on the device button
    (The program will write the firmware to the adapter)
  6. Your scanner has been updated!

In the first version of the ScanDoc scanner (in a metal case), you can change the IP address.

Change IP in adapter button need to change the IP address in the adapter only.

  1. In the IP item: write the current IP address of the scanner;
  2. Click the Change IP in adapter button;
  3. In the new window, write a new IP address and click the Install button.

The Debug is necessary to save the LOG file about the program's operation (you can send it to us if you have any problems with the program). The directory for storing LOG files can be changed in the next item.